heading
Detalles |
Basado en el galardonado NH-C14
Tras haber recibido más de 200 premios y recomendaciones de las principales páginas web y revistas internacionales especializadas en hardware, el NH-C14 se ha convertido en el referente de los disipadores de alto rendimiento de 140 mm. Gracias a su conjunto de aletas más profundas y a su ventilador NF-A14 PWM más eficiente, la nueva versión S ofrece un rendimiento similar y una compatibilidad mejorada.
|
Diseño en forma de C para un flujo máximo
El diseño en forma de C del NH-C14S no solo permite un rendimiento de refrigeración altamente silencioso, sino que mantiene un perfil mucho más bajo que los actuales disipadores estilo torre de 140 mm. Asimismo, también garantiza un excelente flujo de aire sobre los módulos RAM y los componentes de la placa base cercanos al socket.
|
Modo de bajo perfil
Funcionando con el ventilador NF-A14 instalado bajo el conjunto de aletas, el NH-C14S solo mide 115 mm de altura, medida muy inferior a la obtenida con los disipadores estilo torre con ventiladores de 140 o 120 mm, lo que lo hace idóneo para su uso en muchas cajas para equipos de sobremesa o HTPC.*
|
Modo de amplio espacio
Funcionando con el ventilador NF-A14 instalado en la parte superior, el NH-C14 proporciona un mayor espacio bajo el conjunto de aletas. De este modo, es totalmente compatible con los disipadores de chipset y módulos RAM con dispersores de calor de hasta 70 mm de altura.
|
Diseño inclinado para despejar el PCI
Al compararlo con el NH-C14 original, en el NH-C14S se han inclinado dos ejes. Gracias a ello, el disipador despeja la ranura PCIe superior en la mayoría de placas base µATX y ATX cuando las curvaturas de los heatpipes se sitúan frente a las ranuras PCIe o al panel E/S*.
|
Ventilador NF-A14 de 140 mm y gran calidad
Dotado del marco AAO de Noctua y de medidas avanzadas de diseño aerodinámico, como los Canales de Circulación Acelerada (Flow Acceleration Channels), el NF-A14 se ha labrado una reputación como uno de los mejores ventiladores de 140 mm del mercado.
|
Soporte PWM y Adaptador para la reducción de ruido
El ventilador NF-A14 de alta calidad suministrado con el NH-C14S incluye el soporte PWM para un conveniente control automático de la velocidad a través de la placa base. Además, la velocidad máxima del ventilador puede reducirse de 1500 a 1200 rpm, de modo que se puede obtener un funcionamiento más silencioso al utilizar el Adaptador para la reducción de ruido.
|
Sistema de montaje SecuFirm2™
Los sistemas de montaje SecuFirm2™ de Noctua se han convertido en sinónimo de calidad, seguridad y facilidad de uso. Al ser compatibles con Intel LGA115x (LGA1150, LGA1151, LGA1155, LGA1156), LGA2011 (LGA2011-0, LGA2011-3), LGA2066 y AMD (AM4 (incluido desde 2019), AM3(+), AM2(+), FM1, FM2(+)), el montaje de SecuFirm2™, incluido con el NH-C14S, garantiza una presión de contacto perfecta y una comodidad máxima en todos los sockets.
|
Compatibilidad con los antiguos y nuevos sockets
Al cumplir con los estándares del SecuFirm™, el disipador es compatible con los sockets más antiguos LGA1366 y LGA775 al utilizar el kit de montaje opcional NM-I3 que Noctua ofrece de manera gratuita. Si es técnicamente posible, Noctua también proporcionará los kit de actualización de los nuevos sockets.
|
Compuesto térmico NT-H1
Tras haber recibido más de 100 premios y recomendaciones de periodistas especializados de todo el mundo, el NT-H1 de Noctua es una solución térmica profesional y de probada calidad que proporciona una resistencia térmica mínima, gran facilidad de uso y una destacable fiabilidad.
|
6 años de garantía
Los productos de Noctua son conocidos por su impecable calidad y destacada longevidad. Al igual que todos los demás ventiladores de Noctua, el NF-A14 ofrece un tiempo medio de vida entre fallos (MTBF) de más de 150 000 horas y el paquete NH-C14S completo viene con una garantía total del fabricante de 6 años.
|
*Compruebe nuestra lista de compatibilidad de placas base para obtener información más detallada.
|

|
||
Intel LGA2066, LGA2011-0 & LGA2011-3 (Square ILM), LGA1156, LGA1155, LGA1151, LGA1150 & AMD AM2, AM2+, AM3, AM3+, FM1, FM2, FM2+ (backplate necessario), AM4 (included since 2019, older coolers require NM-AM4)
|
||
Altura (sin ventilador)
115 mm
|
||
Anchura (sin ventilador)
140 mm
|
||
Profundidad (sin ventilador)
163 mm
|
||
Peso (sin ventilador)
820 g
|
||
Altura (con ventilador)
115 / 142 mm
|
||
Anchura (con ventilador)
140 mm
|
||
Profundidad (con ventilador)
163 mm
|
||
Peso (con ventilador)
1015 g
|
||
Material
Cobre (base y heat-pipes), aluminio (aletas de refrigeración), uniones soldadas, niquelado
|
||
TDP max.
|
||
Tamaño del ventilador
140x140x25mm (con marco cuadrado)
|
||
Volumen de entrega
|
||
6 años
|
|
||
Modelo
|
||
Rodamiento
|
||
Velocidad de rotación max. (+/-10%)
1500 RPM
|
||
Velocidad de rotación con L.N.A. max. (+/-10%)
1200 RPM
|
||
Velocidad de rotación min. (PWM, +/-20%)
300 RPM
|
||
140,2 m³/h
|
||
115,5 m³/h
|
||
Sonoridad max.
24,6 dB(A)
|
||
Sonoridad con L.N.A. max.
19,2 dB(A)
|
||
Potencia
1,56 W
|
||
Voltaje
12 V
|
||
MTTF
> 150.000 h
|
![]() |

|
|||||||
NH-C14S Opinión
Noctua's NH-C14S is definitely impressive since it offers performance almost on par with the NH-D15S, but with better memory clearance. It also has the added bonus of cooling surrounding motherboard components. Like all Noctua coolers, it's very quiet, coming in at just 43 dBA with the fan at maximum RPM. Did I mention that it offers exceptional clearance? Not just for memory since its offset design means it does not interfere with the motherboard's first expansion slot. This makes the NH-C14S a suitable candidate for many mini-ITX and micro-ATX systems, especially with its maximum height of 115 mm in low-profile mode. As expected, build quality is top notch, and installing the NH-C14S is a breeze with Noctua's tried and tested SecuFirm 2 mounting system. Add in the solid packaging, a good accessories bundle, and an awesome warranty, and you end up with a very attractive product.
|
|||||||
Resultado del análisis: "If you do prefer a C-type design cooler that cools more than the CPU and need top-tier performance with no noise, the NH-C14S may just be what you are looking for." (Raymond Lemar, techPowerUp.com)
|
|
|||||||
NH-C14S Opinión
The NH-C14S takes the already great design of the NH-C14 and refines it to a new level. What does the NH-C14S bring to the table? It gets the job done with a single, more powerful fan, and the new offset of the fin stack provides clearance for the first PCIe slot on your motherboard. The C-type design gives you a much lower profile that lets you build your system in most HTPC-style cases. You still get the options of using either Low Profile mode or High Clearance mode. And of course, all that air the NF-A14 moves through the cooler gets directed down across the RAM modules, VRM, and other motherboard components. That amounts to extra cooling for free. The SecuFirm2™ mounting system is just the greatest thing. Installing a cooler really can't be much easier. It really needs to be an industry standard in my opinion.
Typically, the thermal demands of an average HTPC system are not excessive, so a small cooler can get the job done. If you are building a more intense system, maybe an HTPC that will be hammering on the CPU, or gaming rig in a smaller case, then you will need a cooler that is up to the task. Performance of the NH-C14S is right in line with a cooler this size, so if you are building a system in a shallow case and need the cooling capacity that, for example, an overclocked 4770K might require, then you are in luck. Of course, you will want to make sure that you have adequate air flow through the case. The cooler may be able to handle the heat, but you still have to get the heat out of the case.
Noctua just has it all covered. From the packaging to the last turn of the screwdriver, it is like I said at the beginning, you aren't just getting a cooler, you are getting an experience. Fit and finish are top-notch, as usual with Noctua. The center support rod seems to do a fine job of providing rigidity to the cooler. It feels rock solid. The single NF-A14 140mm PWM fan is right at home on the NH-C14S, quietly doing its job.
The NH-C14S is a premium, top-flow cooler that is highly capable of handing normal everyday use, and it has proven that it can stand up to the demands of overclocking. With a six-year warranty, the NH-C14S retails for $79.99 and would be right at home in your HTPC build.
|
|||||||
Resultado del análisis: "Noctua just has it all covered. From the packaging to the last turn of the screwdriver, it is like I said at the beginning, you aren't just getting a cooler, you are getting an experience." (Chris Dawalt, OverclockersClub.com)
|
|
|||||||
NH-C14S Opinión
Hinsichtlich Geräuschpegel kann man sich beim NH-C14S von Noctua kaum beschweren. Bei 7 Volt betrieben, sind die Lüfter so gut wie unhörbar und selbst bei 12 Volt kann man den Kühler noch als leise bezeichnen.
|
|||||||
Resultado del análisis: "Günstig ist dieser Brocken somit nicht, dafür aber erhält man schliesslich auch Kühlleistung satt sowie eine unhörbar leise Geräuschkulisse. Unterm Strich handelt es sich hier um ein Produkt, das wir definitiv empfehlen können." (Marc Büchel, ocaholic.ch)
|
|
|||||||
NH-C14S Opinión
Der Vorteil des Single-Lüfter-Betriebs ist die deutlich verbesserte Kompatibilität. Wenn der Lüfter unterhalb der Kühllamellen montiert wird, sinkt die Gesamtkühlerhöhe deutlich, sodass der NH-C14S auch in kompakteren Gehäusen Platz findet. Wenn hingegen die RAM-Kompatibilität wichtig ist, schnallt man den Lüfter einfach von oben auf den Kühler und lässt den NH-C14S lässig die meisten RAM-Module überragen. Dass zudem auch noch die PCIe-Kompatibilität verbessert wurde, sorgt endgültig für eine weitgehend sorgenfreie Installation. Dabei fällt der NH-C14S so wuchtig aus, dass er trotz der Top-Blow-Bauweise eine beachtliche Kühlleistung vorweisen kann. Auch ein leistungsstarker Prozessor wie der Core i7-4790K wird von Noctuas runderneuertem Top-Flow-Kühler mühelos in Schach gehalten. Leistungsstarke Towerkühler sorgen zwar für noch etwas niedrigere Temperaturen, aber auch der NH-C14S hat noch ordentlich Reserven für heiße Sommertage, Übertaktungsversuche oder schlicht auch den Betrieb mit weit heruntergereltem Lüfter. Dabei profitiert auch dieser Kühler wieder von Noctuas Premiumanspruch.
|
|||||||
Resultado del análisis: "Egal ob Kühler, Lüfter oder Montagezubehör - alle Teile fallen wertig und überzeugend aus und sorgen dafür, dass der NH-C14S ein zwar teures, aber ungemein stimmiges Gesamtpaket darstellt. Nach dem NH-D15S erhält deshalb auch das Top-Blow-S-Modell unseren Exzellent Hardware-Award." (Philipp Moosdorf, Hardwareluxx.de)
|
|
|||||||
NH-C14S Opinión
I absolutely love this cooler, it ticks all the right boxes for a high-end cooler and so much more. It’s a little on the pricey side, getting into the territory where a budget AIO water cooler could offer lower temperatures for a similar price, but like for like performance, build quality and the assurance that it’s going to keep running for many years without fault, you won’t find that in an AIO at this price. The Noctua also wins out on the acoustic performance, and it doesn’t take long to hear (or not hear) why Noctua coolers and more specifically in this instance, their fans, have won so many awards and can command a price premium.
If you’re looking to build a system where compatibility is important, you’ll be very happy with the SecuFirm2 Mounting System. This cooler is really easy to install, remove and maintain. There’s room for an additional fan should you need it, although I personally don’t think it’s required, even when overclocking. The top flow design means that any conflicts with your systems VRM, memory and bigger expansion cards are simply not going to happen. You can orientate the cooler whichever way suits your build and while it is quite tall, it’s still shorter than most tower coolers overall.
The inclusion of extremely high-quality fittings, a tube of some of the best thermal paste money can buy, even a custom screwdriver to help you get the cooler installed as quickly and easily as possible. It’s all these little extras that show Noctua’s dedication to quality and they’re the perfect complement to the exceptional build quality and design of the cooler.
|
|||||||
Resultado del análisis: "The Noctua NH-C14S is simply one of the best coolers on the market today, with a fantastic visual design, great system compatibility, virtually silent operation and so more!" (Peter Donnell, eTeknix.com)
|
|
|||||||
NH-C14S Opinión
The transformation of the NH-C14 to the NH-C14S was a very slight one. The tower simply needed to be shifted slight over, and at first glance the differences are nearly imperceptible. Thankfully the performance differences are imperceptible, as well, leaving you with simply a more compatible NH-C14. That said, the NH-C14S sits firmly atop the performance charts of top down coolers at any price. Mind you, pricing also sits atop that chart, but at $79.95 retail it is more than fair. Leaving the top down aspect aside for a moment and looking from purely a performance standpoint, the NH-C14S still sits at the top of performance in its price class regardless of configuration. It gives up only a couple of degrees in our overclocked tests to the likes of the NH-D15, Cryorig R1 and H100i GTX, and is less expensive and quieter than any of these while having far more compatibility. It also gives up nothing in terms of build quality, sporting the same flawless fit and finish we have come to expect from Noctua products and what is arguably the best mounting kit on the market.
|
|||||||
Resultado del análisis: "While a builder typically has to make certain concessions when using a larger air cooler, the only concession made with the NH-C14S is lack of trouble caused by component interference. The NH-C14S simply provides excellent performance with great compatibility and low noise, essentially the SFF builder’s dream. With that, the Noctua NH-C14S comes highly recommended and is the recipient of the Hi Tech Legion Editor’s Choice Award." (George Cella, HiTechLegion.com)
|
|
|||||||
NH-C14S Opinión
Impostando le ventole al massimo dei giri si assiste ad un consistente boost prestazionale che permette ad entrambi i dissipatori di raggiungere temperature mediamente inferiori di 5 °C rispetto alla precedente prova.
Anche in questo caso le prestazioni delle nuove soluzioni Noctua hanno dell'incredibile, con soli 52,2 °C per il modello NH-D15S e 56,3 °C per il modello NH-C14S con ben 300W di potenza applicati.
In questa prova, come abbiamo avuto di appurare durante le rilevazioni fonometriche, la rumorosità è aumentata esponenzialmente rispetto a quella a 7V, risultando comunque essere accettabile.
Ricordiamo, inoltre, che trattandosi di ventole PWM difficilmente raggiungeranno il massimo dei giri nelle normali condizioni di utilizzo, soprattutto una volta utilizzato l'adattatore Low-Noise fornito a corredo.
|
|||||||
Resultado del análisis: "Design sofisticati, materiali eccelsi e prestazioni da far impallidire la concorrenza sono ormai una costante in ognuno dei dissipatori targati Noctua.
Ed i nuovi NH-D15S e NH-C14S non sono da meno grazie a strutture davvero robuste ed efficienti e a ventole estremamente performanti e silenziose." (Alfonso Basilicata, NextHardware.com)
|
|
|||||||
NH-C14S Opinión
Positiv ist uns am Noctua NH-C14S die Kühl-Performance in Verbindung mit einer guten Kompatibilität zu dem obersten PCIe-Steckplatz, den RAM-Modulen bis zu einer möglichen Höhe von 65 Millimetern und einer möglichen Gesamthöhe von 105 Millimetern aufgefallen. Auch das SecuFirm2-Systems können wir nur nochmals hervorheben, da es wirklich seinesgleichen sucht. Der mitgelieferte Lüfter verrichtete bei reduzierter Drehzahl alles in Allem seine Arbeit leise. Dank der beiliegenden Klammern kann problemlos der Kühler um ein weiteres Exemplar, auf Kosten der Gesamthöhe des Kühlers oder aber der möglichen Höhe der Speichermodule, je nachdem wo man den ersten Lüfter platziert hat, erweitert werden.
|
|||||||
Resultado del análisis: "Der österreichische Hersteller Noctua liefert sowohl mit dem NH-C14S als auch mit dem NH-D15S gute Produkte ab, so dass die Anfangs gestellte Frage "s" wie super?" in fast allen Belangen mit einem "Ja" beantwortet werden kann." (Christopher Vollrath, PC-Max.de)
|
|
|||||||
NH-C14S Opinión
En el gráfico anterior podemos observar las temperaturas alcanzadas por el Noctua NH-C14S. Vemos así como con una temperatura ambiente de 24ºC, alcanzamos los 69.5ºC bajo carga de trabajo (3.90 GHz) y subimos hasta los 79.75ºC realizando cierto overclocking al procesador (4.20 GHz). Teniendo en cuenta que nuestro i7-4770K es muy muy calentorro, son excelentes temperaturas para mantener cualquier procesador con una alta dosis de overclocking, incluso los de alto TDP.
|
|||||||
Resultado del análisis: "El Noctua NH-C14S es una excelente opción para chasis que limitan en gran medida la altura del disipador, pues si usamos memorias de perfil bajo (hasta 40 mm) podremos colocar el ventilador por debajo del radiador y tener una altura del conjunto de tan solo 115 mm, con un rendimiento sensacional. Si tenemos algo más de espacio, podemos optar por un segundo ventilador o por colocar el primero sobre el radiador y subir la capacidad de memorias hasta los 70 mm, aunque la altura del conjunto asciende hasta los 140 mm. Eso sí, en todo caso la sonoridad es mínima y tenemos total compatibilidad con el primer slot PCIe." (Iván Martínez, El Chapuzas Informático)
|
|
|||||||
NH-C14S Opinión
+ vysoký výkon pri
maximálnych otáčkach
+ vynikajúci pomer výky ku chladiacej účinnosti + nadtandardná podpora zo strany výrobcu (predzvesť kompatibility i o niekoľko rokov) + pevná a veľmi pohodlná montá k základnej doske + s ventilátorom hore nekoliduje ani s najvýími pamäťami + osvedčený dlhoveký ventilátor s tichým motorčekom + prvotriedne dielenské spracovanie pasívu + optimalizácia pasívu na ravých pretaktovaných procesoroch výrazne výkonnejí ne C14 |
|||||||
Resultado del análisis: "Kto hľadá hľadá luxusný chladič do malej,
výkovo obmedzenej skrinky pribline na formát dnes testovanej
Noctuy a na cene mu zase a tak nezáleí, je NH-C14S dosť
mono pravdepodobne tým najlepím, čo viete svojmu
procesoru a uiam dopriať, za čo udeľujeme chladiču
zaslúené ocenenie We Want It!."
(Ľubomír Samák, ExtraHardware.cz)
|
NM-I3 Mounting-Kit
- El soporte de montaje NM-I3 SecuFirm2™ convierte a los disipadores para CPU de Noctua en compatibles con los sockets LGA775/1366 de Intel.

NM-AM4 mounting-kit
- El soporte de montaje NM-AM4 SecuFirm2™ convierte a los disipadores para CPU de Noctua en compatibles con el socket AM4 de AMD.

Es posible comprar nuestros productos a través de nuestros colaboradores locales de ventas o directamente con nosotros desde nuestras tiendas oficiales de Amazon o eBay:
- Manual de instalación & Hoja de datos (PDF)
- Preguntas frecuentes
- MAINBOARD COMPATIBILIDAD
- CASE COMPATIBILITY
- CPU COMPATIBILITY
Preguntas frecuentes
In which orientation should top-flow coolers (NH-C series, NH-L12) be installed?
Can I install a Noctua cooler in my system from Acer, Dell, HP or Lenovo?
Which sockets are supported or can be supported using upgrade kits?
How should I clean my Noctua cooler?
Can I upgrade my existing Noctua cooler to socket TR4 or SP3?
I’ve used all the NT-H1 thermal compound that came with the cooler, can you send me more?
Which Noctua CPU coolers are compatible with AMD AM4 (Ryzen)?
Which Noctua CPU coolers are compatible with Intel LGA2066?
My case supports CPU coolers of up to XXXmm height, which model should I choose?
I have difficulties installing the cooler, can you help?
I'm experiencing fan speed issues with my motherboard from Supermicro, what can I do?
I get a CPU fan error using my Noctua PWM fan, is it faulty?
My Noctua PWM fan runs at a much higher minimum speed than advertised, what is wrong?
My Noctua PWM fan starts to spin when the PC boots but then stops, what is wrong?
My Intel CPU is running too hot although my heatsink supports the specified TDP, what's the problem?
How much torque should be applied when tightening the screws of a Noctua CPU cooler?
Can I keep using the backplate / mounting system of my previous Noctua cooler for my new one?
Does the mounting-system support LGA2011 based Xeon CPUs?
How to remove the base protection cover?
Does the package include a backplate for AMD AM2(+)/AM3(+)/FM1/FM2(+)?
Can the cooler be installed turned by 90° on AMD sockets?
I can't open the socket due to the mounting bars!
Why doesn't the supplied backplate fit my LGA2066 / LGA2011 motherboard?
Should I take the cooler off before transporting my system?
How big is the NH-C14S and how much clearance does it provide for RAM and mainboard heatsinks?
Why is the cooler’s contact surface slightly convex?
Is the cooler compatible with the LGA2011-3 socket?
Is the cooler compatible with the LGA1151 socket?
¿Por qué la base de los disipadores Noctua no tiene un acabado pulido como un espejo?
Is the cooler compatible with LGA775 and LGA1366?
How can I check if my Noctua CPU cooler already includes AM4 mounting parts?
Is it possible to use the cooler with vertical graphic cards?
How can I check whether my case is wide/high enough for the cooler?
Which Noctua fan or CPU cooler should I buy? How to choose the right model?
In which orientation should top-flow coolers (NH-C series, NH-L12) be installed?

Can I install a Noctua cooler in my system from Acer, Dell, HP or Lenovo?
Systems from Acer, Apple, Dell, HP, Lenovo or other major brands often use motherboards which differ slightly from the specifications issued by Intel and AMD. While those changes are usually subtle, they can lead to compatibility issues with coolers that were built to comply with these specifications.
Even in case the cooler is mechanically compatible and can be installed, other issues can occur, e.g. proprietary fan connectors, BIOS errors due to a low fan speed, shutdowns, etc. Some of these problems can be avoided with some technical knowledge, but especially BIOS related issues can often not be resolved.
Due to the large number of possible issues that cannot be resolved with different mounting parts alone, Noctua does not officially support systems from Acer, Apple, Dell, HP, Lenovo or other major brands.
What Thermal Design Power (TDP) is this cooler recommended for and how much Watt (W) of heat can it dissipate?
Which sockets are supported or can be supported using upgrade kits?
How should I clean my Noctua cooler?
Thermal paste residues: Whenever you take off the heatsink from the CPU, we recommend to clean the CPU as well as the base of the cooler before re-applying thermal paste and re-installing the cooler. You can either just wipe the base and the CPU clean with a dry, lint-free tissue or, for more thorough cleaning, use a lint-free tissue moistened with either a mild solution of washing-up liquid or isopropyl alcohol. Do not put the cooler or CPU under running water. Note that both the base of the heatsink and the CPU should be dry, free from residues of thermal compound and free from grease before re-applying thermal paste and re-installing the cooler.
Can I upgrade my existing Noctua cooler to socket TR4 or SP3?
I’ve used all the NT-H1 thermal compound that came with the cooler, can you send me more?
Which Noctua CPU coolers are compatible with AMD AM4 (Ryzen)?
NH-D15 (AM4 mounting included since 2019, only older coolers require upgrade kit)
NH-D15 SE-AM4
NH-D15S (AM4 mounting included since 2019, only older coolers require upgrade kit)
NH-U14S (AM4 mounting included since 2019, only older coolers require upgrade kit)
NH-U12S (AM4 mounting included since 2019, only older coolers require upgrade kit)
NH-U12S SE-AM4
NH-U9S (AM4 mounting included since 2019, only older coolers require upgrade kit)
NH-D9L (AM4 mounting included since 2019, only older coolers require upgrade kit)
NH-C14S (AM4 mounting included since 2019, only older coolers require upgrade kit)
NH-L12S
NH-L9x65 (AM4 mounting included since 2019, only older coolers require upgrade kit)
NH-L9x65 SE-AM4
NH-L9a-AM4
The following models can be made compatible with the AM4 socket free of charge using the NM-AM4 upgrade-kit:
NH-C12P
NH-C12P SE14
NH-C14
NH-C14S (AM4 mounting included since 2019, only older coolers require upgrade kit)
NH-D14
NH-D14 SE2011
NH-D15 (AM4 mounting included since 2019, only older coolers require upgrade kit)
NH-D15S (AM4 mounting included since 2019, only older coolers require upgrade kit)
NH-D9L (AM4 mounting included since 2019, only older coolers require upgrade kit)
NH-L12
NH-L9x65 (AM4 mounting included since 2019, only older coolers require upgrade kit)
NH-U12
NH-U12F
NH-U12P
NH-U12P SE1366
NH-U12P SE2
NH-U9
NH-U9B
NH-U9B SE2
NH-U9F
The following models can be made compatible with the AM4 socket free of charge using the NM-AM4-UxS upgrade-kit:
NH-U14S (AM4 mounting included since 2019, only older coolers require upgrade kit)
NH-U12S (AM4 mounting included since 2019, only older coolers require upgrade kit)
NH-U9S (AM4 mounting included since 2019, only older coolers require upgrade kit)
The following models can be made compatible with the AM4 socket free of charge using the NM-AM4-L9aL9i upgrade-kit:
NH-L9a
NH-L9i
The following models can be made compatible with the AM4 socket using the NM-AM4 upgrade-kit but are not eligible for Noctua‘s free mounting offer, so users have to purchase the kit at local resellers:
NH-U12DO (Note that the A3 version is not compatible!)
NH-U12DX
NH-U12DX 1366
NH-U12DX i4
NH-U9DX i4
NH-U9DX 1366
NH-U9DO (Note that the A3 version is not compatible!)
The following models are not compatible with the AM4 socket and can not be upgraded:
NH-U14S TR4-SP3
NH-U12S TR4-SP3
NH-U9 TR4-SP3
NH-U12DO A3
NH-U9 DO A3
Which Noctua CPU coolers are compatible with Intel LGA2066?
Due to the heatsink mounting mechanism being identical on LGA2011 and LGA2066, Noctua’s SecuFirm2™ mounting systems for LGA2011 also support Intel’s upcoming ‘Basin Falls’ X299 HEDT (High End Desktop) platform for ‘Skylake-X’ and ‘Kaby Lake-X’ processors. Most current Noctua coolers already include SecuFirm2™ mounting systems for LGA2011 and can thus be used on LGA2066 motherboards without any upgrades or modifications.
The following models include a mounting-kit for socket LGA2011/2066 and are thus compatible out of the box:
NH-C14S
NH-D14 SE2011
NH-D15
NH-D15S
NH-D9L
NH-L12
NH-L9x65
NH-U12S
NH-U12DX i4
NH-U14S
NH-U9DX i4
NH-U9S
The following models can be made compatible with the LGA2011/LGA2066 sockets free of charge using the NM-I2011 upgrade-kit:
NH-C12P
NH-C12P SE14
NH-C14
NH-D14
NH-D15 SE-AM4
NH-U12S SE-AM4
NH-L9x65 SE-AM4
NH-U12
NH-U12F
NH-U12P
NH-U12P SE1366
NH-U12P SE2
NH-U9
NH-U9B
NH-U9B SE2
NH-U9F
The following models can be made compatible with the LGA2011/LGA2066 sockets using the NM-I2011 upgrade-kit but are not eligible for Noctua‘s free mounting offer, so users have to purchase the kit at local resellers:
NH-U12DO (Note that the A3 version is not compatible!)
NH-U12DX
NH-U12DX 1366
NH-U9DX 1366
NH-U9DO (Note that the A3 version is not compatible!)
The following models are not compatible with the LGA2011/LGA2066 sockets and can not be upgraded:
NH-L9a
NH-L9i
NH-U12DO A3
NH-U9DO A3
My case supports CPU coolers of up to XXXmm height, which model should I choose?
I have difficulties installing the cooler, can you help?
I'm experiencing fan speed issues with my motherboard from Supermicro, what can I do?
The BIOS of many motherboard models from Supermicro expects a certain minimum fan speed (usually 600 or 700rpm), which is higher than the minimum fan speed that can be achieved with Noctua's PWM fan models. The BIOS may interpret the low minimum RPM of Noctua fans as a fan error and thus try to run the fan at 100% for a short period before going back to automatic control. This can result in oscillating fan speeds and fan speed warnings in the BIOS or the fan management console.
Unfortunately there is usually no option to set a lower minimum value in the BIOS that would suit the low minimum speed of Noctua PWM fans. The issue can thus only be resolved by either disabling automatic fan speed control in BIOS, which will cause the fans to run at a constant speed, by using 3rd party tools like IPMItool or IPMIutil, or by requesting a modified BIOS file from Supermicro, which takes the minimum fan speed of Noctua fans into account (charges might apply). Please note that any modifications performed with 3rd party tools are done at your own risk and that Noctua can not be held responsible for any possible issues.
I get a CPU fan error using my Noctua PWM fan, is it faulty?
My Noctua PWM fan runs at a much higher minimum speed than advertised, what is wrong?
- Many mainboards do not go below 40%, 50% or even 60% PWM duty cycle on case fan headers. Please refer to your mainboard manual to verify whether the fan header actually goes down to 20% duty cycle. If that's not the case, in some cases you can use the fan speed control software supplied with your mainboard to overcome these limitations and reduce the fan speed even further. However, 3rd party tools like SpeedFan offer greater flexibility and better options to work around the limitations imposed by the mainboard vendors.
- Some mainboards feature 4-pin fan headers that actually don‘t use a PWM signal on Pin 4 to control the fan speed but rather reduce the voltage on Pin 2 (like a standard 3-pin fan header). As the fan speed at minimum voltage is usually higher than the speed at 20% PWM duty cycle, the fan can not reach as low minimum speeds under voltage control as under PWM control. Please refer to your mainboard manual to check whether or not your mainboard has 4-pin fan headers that control the fan speed by reducing voltage on Pin 2 rather than by changing the PWM duty cycle on Pin 4:
Note that mainboard manufacturers use different terms to indicate that Pin 4 is not being used for PWM control (e.g. “+5V”, “VCC” or “NC”), but if one of these terms is used, you can be sure that the fan header does not support PWM. If Pin 4 is described as “Speed Control” or “PWM” or the like, you can be sure that the fan header supports PWM.
Unfortunately, the description of Pin 2 is not always a clear indication as some manufacturers use terms such as “Fan PWR” or “Power” for both types of fan headers. However, if Pin 2 is described as “Speed Control”, you can also be sure that the fan header does not support PWM based speed control. If Pin 2 is described as “+12V”, this is a clear indication that the fan header supports PWM.
Please also note that in some cases, the descriptions of the pin layouts in the mainboard manuals may not be correct and some models actually allow you to switch the fan headers from voltage control mode to PWM control mode in the BIOS even though the pin descriptions do not indicate PWM support. We thus recommend to look for these options in the BIOS before taking other measures. In case of doubt, please contact your mainboard manufacturer.
If your mainboard features other 4-pin fan headers that use PWM for speed control, you can run multiple fans from these headers using Y-split cables. Make sure not to exceed the specified maximum power draw of the fan headers (usually 10-12W) though.
My Noctua PWM fan starts to spin when the PC boots but then stops, what is wrong?

Note that mainboard manufacturers use different terms to indicate that Pin 4 is not being used for PWM control (e.g. “+5V”, “VCC” or “NC”), but if one of these terms is used, you can be sure that the fan header does not support PWM. If Pin 4 is described as “Speed Control” or “PWM” or the like, you can be sure that the fan header supports PWM.
Unfortunately, the description of Pin 2 is not always a clear indication as some manufacturers use terms such as “Fan PWR” or “Power” for both types of fan headers. However, if Pin 2 is described as “Speed Control”, you can also be sure that the fan header does not support PWM based speed control. If Pin 2 is described as “+12V”, this is a clear indication that the fan header supports PWM.
Please also note that in some cases, the descriptions of the pin layouts in the mainboard manuals may not be correct and some models actually allow you to switch the fan headers from voltage control mode to PWM control mode in the BIOS even though the pin descriptions do not indicate PWM support. We thus recommend to look for these options in the BIOS before taking other measures. In case of doubt, please contact your mainboard manufacturer.
To resolve the issue, you can:
Choose a higher fan speed profile in the BIOS (e.g. „normal“ instead of „silent“, etc.) or deactivate automatic fan speed control and use a Low-Noise Adaptor instead.
Use the mainboard‘s fan speed control software or 3rd party tools like Speedfan to regulate the fan speed. Unlike BIOS based fan speed control, the supplied software usually checks whether the fan has stopped and increases voltage accordingly or at least offer more options to set up the fan properly.
If your mainboard features other 4-pin fan headers that use PWM for speed control, you can run multiple fans from these headers using Y-split cables. Make sure not to exceed the specified maximum power draw of the fan headers (usually 10-12W) though.
Why is my Ryzen 3000 processor getting so hot? Why are Ryzen 3000 CPUs running hotter than previous generation Ryzen CPUs with the same TDP rating? Is there anything wrong with my cooler?
The latest Ryzen 3000 processors (except APU models) differ from previous Ryzen generations in that they are no longer based on a single, large chip but use a multi-chip approach with smaller chips instead. Depending on the exact model there can be one (6 and 8-core models) or two (12 and 16-core models) actual CPU-Dies (CCD) on the package. Each processor also uses an I/O-Die (IOD), which contains things like the memory controller, PCIe controller, connections to the motherboard chipset and other functions.

Because of this design change and the switch to a smaller 7nm manufacturing process, the heat distribution of the overall processor is much different from older 14nm and 12nm based single-chip Ryzen processors with a similar power draw.
Depending on the exact CPU model, its specified TDP value and possibly extended power limits (precision boost overdrive), a single CPU-die can create a heatload of up to 130W easily, whereas the I/O-die usually creates a heatload of about 10W. Due to the small size of the CPU-die, the heat density (W/mm²) of this chip is very high. For example, a 120W heatload at a chip-size of 74mm² results in a heat-density of 1.62W/mm², whereas the same heatload on an older Ryzen processor with a chip-size of 212mm² gives a heat-density of just 0.57W/mm².
This large difference in heat-density is the reason why newer Ryzen 3000 processors become much warmer at similar heatloads than their predecessors.
Furthermore, Ryzen 3000 CPUs are using the rated temperature headroom (up to 95°C) quite aggressively in order to reach higher boost clocks. As a result, it is absolutely no problem and not alarming if the processor runs into this temperature limit. The clock speed and supply voltage will be adjusted automatically by the processor itself in order to remain within AMD’s specifications and to prevent overheating.
Due to the higher heat density, higher thermal limits and more aggressive boost clock usage, it is perfectly normal that Ryzen 3000 CPUs are reaching higher temperatures than previous generation Ryzen CPUs with the same TDP rating. Higher CPU temperatures are normal for Ryzen 3000 processors and not a sign of that there is anything wrong with the CPU cooler.
My Intel CPU is running too hot although my heatsink supports the specified TDP, what's the problem?
Current processors from Intel, especially the unlocked models with the suffixes C, K, X or XE (e.g. Core i7-8700K, Core i9-7900X oder Core i9-9900K) can dissipate noticeably more heat than indicated by the TDP specification.
While many motherboard models stick to the recommended power levels and clock speeds settings from Intel, there are models where the UEFI BIOS is configured in such a way that:
- the TDP limits are extended or disabled.
- the motherboard applies automatic overclocking by default, e.g. by raising the supply voltage of the CPU and using higher Turbo-Mode multipliers.
Depending on the load scenario and CPU configuration settings, the actual power draw can be 1.5-3 times as high the stated TDP value. This can lead to temperature issues, especially when using smaller coolers, compact cases or cases with poor airflow, when some applications create very high loads, e.g. Prime95 with AVX2 support, 3D-rendering or simulation software.
The actual power draw of the processor can be monitored with software provided by the motherboard vendor or with 3rd party tools like HWInfo or HWMonitor.
If you encounter temperature issues (>90°C) and notice a higher than specified power draw, please ensure that no automatic overclocking is applied. You might also want to limit the TDP to either the specified value by Intel or a value that is 5-10W below the value previously read out from the CPU. This can be done in BIOS by setting the “Long Term Duration Power” manually instead of “Auto”.
Furthermore, it may also help to lower the CPU clock speed for applications that heavily use the AVX instruction set, which can lead to higher loads and power draw. This option is usually referred to as “AVX offset” and makes it possible to lower the multiplier specifically for AVX based applications without reducing performance when using other instruction sets. Depending on the quality of the CPU and the programs being used, a reduction of 2-3 steps usually gives very good results.
The option to set an AVX-offset value is usually available for the following CPU generations:
- LGA1151:7th, 8th and 9th generation (Kaby Lake, Coffee Lake)
- LGA2011-3: 6th generation (Broadwell-E)
- LGA2066: 7th and 8th generation (Skylake-X)
Please contact your motherboard vendor for details if you have trouble finding the appropriate settings in the BIOS.
All our TDP recommendations are based on thorough testing with the default values specified by Intel using popular applications such as Asus Realbench and prime95. Please note, however, that prime95 creates a particularly high load that goes beyond most typical application scenarios and this leads to elevated temperatures. We thus recommend using other programs such as Realbench for checking the stability and temperatures of the CPU in realistic scenarios.
Please also note that CPUs that use thermal paste instead of soldering between the DIE and the heatspreader generally run hotter. Due to the thermal bottleneck created by the thermal paste, temperatures can be high even at the specified TDP.
How can I determine if the motherboard’s UEFI BIOS is overclocking my processor by default and deactivate this automatic overclocking?
Most motherboard vendors allow their overclocking-enabled products (e.g. those with Intels X- or Z-series chipsets) to run the processor at increased clock speeds by default, without requiring any user action at all. Since TDP (Thermal Design Power) limits are usually also disabled by default, this leads to the CPU exceeding the rated TDP to a varying degree, depending on the used applications and their workloads. Due to the increased heat output of the CPU, you may see higher CPU temperatures than expected.
In order to find out if your motherboard is overclocking your processor by default, please enter the UEFI BIOS and select the “advanced” or “overclocking” menu. There you should be able to find options such as “MultiCore Enhancement” (options: enabled/disabled), “CPU Ratio Apply Mode” (options: all/per core) or similar. To disable the automatic overclocking, adjust the settings either to “disabled” or “per core” and make sure that the individual multipliers match the original specifications.
In doubt, please contact your motherboard vendor for detailed instructions on how to disable this feature.
How much torque should be applied when tightening the screws of a Noctua CPU cooler?
Screw type | Max. torque |
---|---|
NM-SSC1 screws for fixing the fastening brackets to the base of the heatsink | 0.5 Nm |
NM-ITS1 thumb screws for fixing Intel mounting bars | 0.5 Nm |
NM-ALS1 screws for fixing AMD mounting bars | 0.6 Nm |
Spring-loaded screws for fixing the heatsink to the mounting bars | 0.6 Nm |
Can I keep using the backplate / mounting system of my previous Noctua cooler for my new one?
My unlocked Intel CPU is running too hot although my heatsink supports the specified TDP, what's the problem?
- the TDP limits are extended or disabled in the motherboards' BIOS.
- the motherboard applies automatic overclocking by default, e.g. by raising the supply voltage of the CPU and using higher Turbo-Mode multipliers.
- some software creates untypical loads, e.g. Prime95 with AVX2 support and a) and/or b) apply.
This can lead to temperature issues, especially when using smaller coolers or compact cases.
The actual power draw of the processor can be monitored with software provided by the motherboard vendor or with 3rd party tools like HWInfo or HWMonitor.
If you encounter temperature issues (>90°C) and notice a higher than specified power draw, please ensure that no automatic overclocking is applied and limit the TDP to the specified value by choosing appropriate BIOS settings.
For Kaby Lake CPUs, it may also help to lower the CPU clock speed for applications that heavily use the AVX instruction set, which can lead to higher loads and power draw. This option is usually referred to as “AVX offset” and makes it possible to lower the multiplier specifically for AVX based applications without reducing performance when using other instruction sets. Depending on the quality of the CPU and the programs being used, a reduction of 2-3 steps usually gives very good results.
Please contact your motherboard vendor for details if you have trouble finding the appropriate settings in the BIOS.
All our TDP recommendations are based on thorough testing with the default values specified by Intel using popular applications such as Asus Realbench and prime95. Please note, however, that prime95 creates a particularly high load that goes beyond typical application scenarios and this leads to elevated temperatures. We thus recommend using other programs such as Realbench for checking the stability and temperatures of the CPU in realistic scenarios.
Does the mounting-system support LGA2011 based Xeon CPUs?

How to remove the base protection cover?
The base of Noctua CPU coolers is made from hard-wearing nickel plated copper, so there's nothing to worry about if you buy a Noctua cooler from second hand or if your cooler didn't come with a protection cover. Please proceed with the installation as explained in the manual.
You can simply remove the cover as shown below:

Does the package include a backplate for AMD AM2(+)/AM3(+)/FM1/FM2(+)?

Can the cooler be installed turned by 90° on AMD sockets?
I can't open the socket due to the mounting bars!


Why doesn't the supplied backplate fit my LGA2066 / LGA2011 motherboard?
Should I take the cooler off before transporting my system?
How big is the NH-C14S and how much clearance does it provide for RAM and mainboard heatsinks?
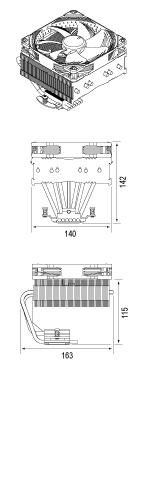
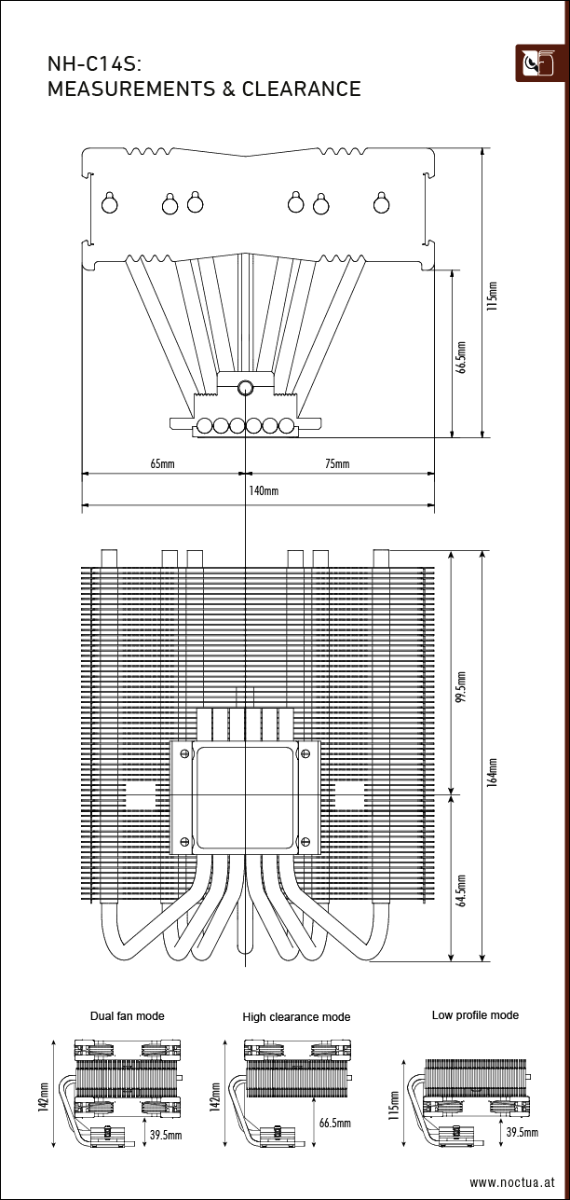
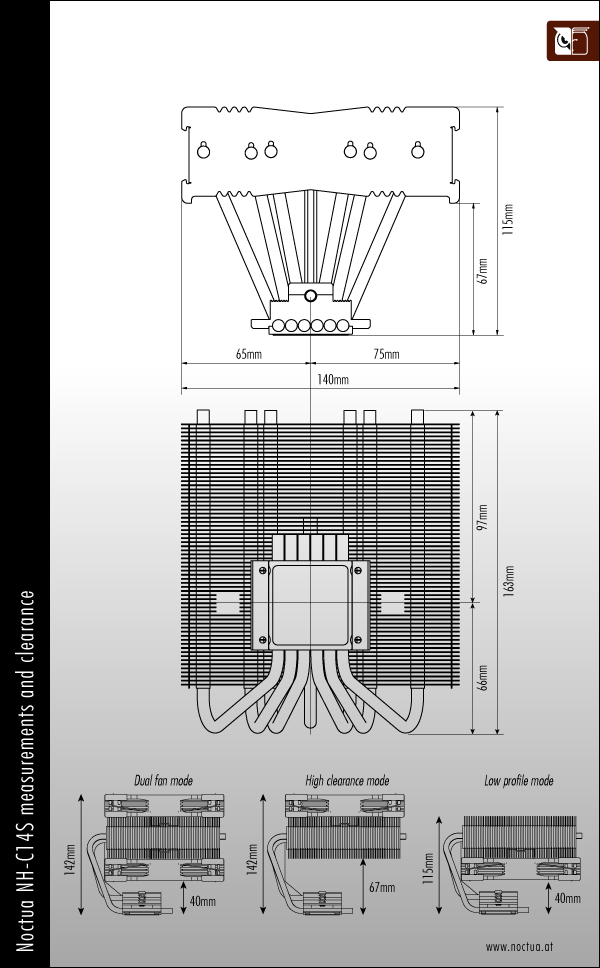
Please refer to the following drawing for the exact measurements and clearance for RAM and motherboard heatsinks:
Why is the cooler’s contact surface slightly convex?
Is the cooler compatible with the LGA2011-3 socket?
Is the cooler compatible with the LGA1151 socket?
¿Por qué la base de los disipadores Noctua no tiene un acabado pulido como un espejo?
Is the cooler compatible with LGA775 and LGA1366?
How can I check if my Noctua CPU cooler already includes AM4 mounting parts?
- Check the socket compatibility specifications on the packaging. If they include AM4, AM4 parts are included.
- Opening the packaging, check the printing on the accessories box. If the AMD parts pictured on the box include both a white and a grey spacer, the cooler supports AM4.
- Opening the accessories box, check the AMD bag. If it includes both white and grey spacers, the cooler supports AM4.
- Check if the AMD bag contains either NM-AMB8 or NM-AMB11 mounting bars.


Is it possible to use the cooler with vertical graphic cards?
How can I check whether my case is wide/high enough for the cooler?
Is it a problem that the CPU heatspreader is not covered completely by the heatsinkbase on LGA2011-3?
How can I check whether my AMD mainboard has a standard AMD backplate that’s compatible with the SecuFirm2™ mounting system and how should I proceed with the installation?
In order to proceed with the installation of your Noctua cooler, please remove the four screws and the retention module but keep the backplate in place so that you can see the screw threads from the top side of the motherboard (see third picture below). You can then proceed with the installation of the SecuFirm2™ mounting kit as described in the manual (see fourth picture below).


Which Noctua fan or CPU cooler should I buy? How to choose the right model?
¿Tiene alguna pregunta sobre uno de nuestros productos? ¡Por favor use este formulario para enviar una pregunta!